
Eventur App Help
General Setup
This section will walk you through installing the application and logging in for the first time.
Your event organizer will typically send out links to the mobile app prior to event. Look for QR code links onsite as well. If you cannot find these, please contact your event organizer.
When you first open Eventur, you will be asked to log in with your email and password. Please use the email address which was provided to the event organizer. Passwords will typically be provided by email shortly before the event.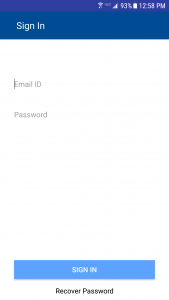
If you cannot remember your password or just need to create a new one, please click the Recover Password link at the bottom of the login screen. Enter your email address that you are trying to log in with and click Submit. This will deliver an email with a link to create a new password. 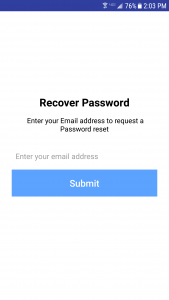
My Profile
You can edit all of your information by going to My Profile. You will also see any photos you have shared in the app.
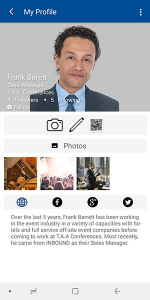
You can upload a profile picture by tapping on the camera icon. Click the Pencil icon to edit your information.
If you are trying to share your contact info with another attendee or exhibitor, tap on the QR code below your profile picture to open it. Your QR code can now be scanned by the Eventur app. 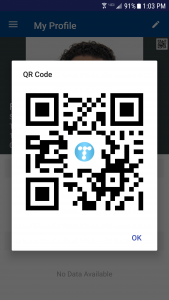 Note that the attendee or exhibitor attempting to scan will need to use either the Contacts or Leads option to perform the scan.
Activity Feed
The Activity Feed is where you will find all of the latest comments and photos from your event. Be sure to visit here regularly to keep up on what is going on! 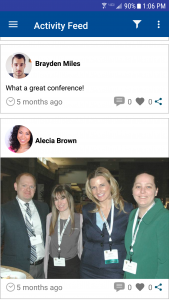
Tap on the red button in the bottom right of the Activity Feed to begin. Then, choose whether you want to share a status, a new photo, or an existing photo from your gallery. 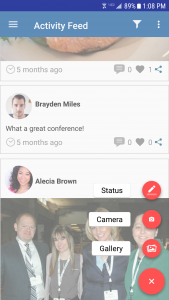
You can comment on any post by tapping on the speech bubble in the bottom right corner of the post’s frame. You will then see any existing comments on the post as well. 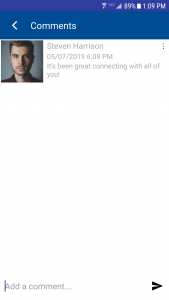
You can share posts to almost any app on your phone by clicking the share icon in the top right corner of a post’s frame.
Sometimes, the content of a post may be a bit long. Or, in the case of a picture, you want to make it larger. You can do this by tapping directly on the content of the post.
In the event that a post appears to violate applicable policies, you can report the post to event management. First, view the post by tapping directly on the content of the post. Then, tap the menu icon in the top right of the screen. You can now tap “Report inappropriate content.”
Agenda
When you are ready to decide which sessions you want to attend, head over to the Agenda. If your event is tracking attendance or providing continuing education, Eventur will make it easy to check into sessions and earn those credits. Certificates will be sent to your email by the event admin after the event.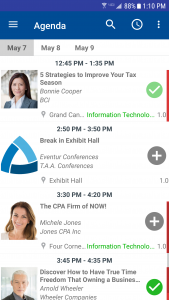
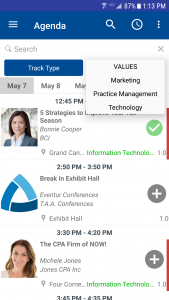
There are several ways to find a session. The first is to simply browse the Agenda. Each day of the event will be broken out across the top. Scroll down the list to see all the sessions for the selected day. You can also find sessions by filtering the Agenda. Click the search icon in the page header.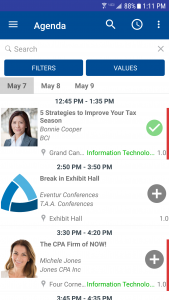
First, select your filter.
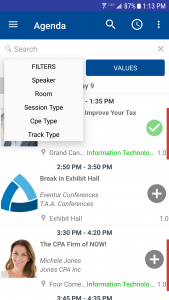
Then, select the value to filter on. The session list will automatically update with sessions that match your filter.
 If you are not sure if a session is the one you want, you can tap on it to view the session’s details.
When you have found a session you want to join, tap the “plus” button on the right of the session. Alternatively, you can tap the “Join Session” button while viewing a session’s details.
When you have joined a session, you will then be able to check in/out when the session is live. You can check in/out by viewing the session details and tapping on the “Check In” button at the very bottom. If the button is not enabled, this is either because the session is not open yet or you have not joined the session. When it is time to check in, your speaker will provide the audience with a code. Tap the “Check In” button and enter the code. Most events will use a 10 minute check in/out window, which means you can check in up to five minutes before the scheduled start of the session and up to five minutes after the scheduled start of the session. Your “Check In” button will now change to “Checked In”, and the session on the Agenda will show a grey checkmark instead of the + sign or join icon.
The same process will apply to checking out of the session. Once you check out, the “Check Out” button will change to “Checked Out”, and the session on the Agenda will show a green checkmark. If you did not check in to the session, you will not be able to check out. If you do not check out of the session, the Agenda will show a red exclamation icon next to the session.
If you are unsure of how long the timeframe to check in/out of a session is, please verify this information with your event organizer. If you have already checked in or out of a session, tapping the menu again will show that you are “Checked In.” Because checking in is used for verifying attendance and granting educational credits, checking in or out after the expiration of the window is not possible. Please see event staff for assistance if you are not able to check in or out of your session.
After checking out of a session, you will be able to take a survey about the session by tapping on the Feedback option in the session details. Your event organizer may require Feedback, which will automatically launch the survey after you check out of your session. This will walk you through the survey, one question at a time.
To participate in discussions about particular session, click on the Q&A option in the session details and select the Comments option. Posts here will also show up in the Activity Feed where other attendees will be able to respond.
If you prefer to keep all of your notes on your phone, you can use the Notes option in the session details. All notes entered here can be exported.
Any materials which the speaker shares with attendees will be available in the Documents option on the session details.
Your event may have additional learning opportunities. You can sign up for these by clicking on the menu in the top right of the Agenda and selecting “Reserve Agendas”. Each day’s availability will be broken out by day. Each learning provider will be broken out separately. Select a provider to view their availability. Any available sessions will show up in green.
 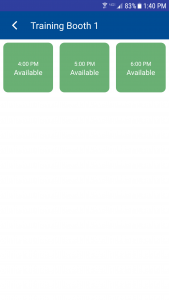 Tap on a session and (if the option is available) provide the subject you would like training on. Click “Submit” to reserve the session and add it to My Timeline.
If you are using Eventur for your calendar during the event, you can create custom appointments to set up meetings outside of the event’s agenda. Tap on the menu in the top right corner of the Agenda and select the “Add Custom Appointment” option. You can add a Title, Description, Location, and appointment date and time before saving it. This appointment will show up in My Timeline.
My Timeline
When you need to see what you have planned next, go to My Timeline. You will be able to find all of the sessions you have joined as well as any training or custom appointments. Tap on a session or appointment to view its details.
You event may include a direct link to My Timeline. If you do not see one, you can also access My Timeline by going to the Agenda and tapping on the “clock” icon in the top right corner.
Attendees
Trying to reach out to a colleague at your event? Use the Attendees option to look them up! You can use the mail icon in the top right of an attendee’s profile to send them a message in the app. All of the attendee’s photos which have been shared through the app will be available below their profile picture.
You can scroll through the entire list of attendees to find the colleague you are looking for, or you can search for them by using the Search bar at the top.
Contacts
When you want to exchange contact info or scan a Golden QR Code for points, use the Contacts option to open the scanner.
Use the QR option and tap “Scan QR Code.” Your camera will be activated, and you will be able to scan another attendee’s QR code. If they are having trouble finding their QR code, they can find it in My Profile. Once they tap on it in the top right corner of their profile picture, their code can be scanned. Their information will be saved in the app’s Contacts.
When you find a Golden QR Code, use the Contacts scanner to collect the points. If you have already scanned it or are scanning a code with limited winners, you will be prompted with a brief on-screen notification.
Messages
Visit Messages to send and read private notes from other users.
Tap the “plus” button in the top right corner of Messages to create a new message. Search for and select the recipient. Then, type out and send your message. Even if the recipient has not yet replied to what you sent them, you will be able to see it in Messages.
You will receive a push notification from the app whenever another user messages you. Visit Messages to view any new communication.
Meet the Team
Your event is being hosted by a great team! You can reach out to them through the Meet the Team option. You can scroll through the entire list of team members to find the one you are looking for, or you can search for them by using the Search bar at the top.
You can use the mail icon in the top right of a team member’s profile to send them a message in the app.
Speakers
Did that last speaker have a great session? They might have other sessions you are interested in!
Go to Speakers and look them up. Or, tap on the Speakers option in one of their sessions and tap on their profile. Their profile will include a schedule of all of their sessions at the event. Tap on one of them to see the details.
Exhibitors
If your event has an exhibit hall, you can find out who is there by going to Exhibitors.
If there are any handouts which you would like to get from an exhibitor, you can view them by tapping on the menu in the top right corner of their profile. Use either “Documents” or “Videos” to access those materials respectively.
All of the exhibitor representatives will be listed in “Booth Attendees” option. You can access this by tapping on the menu in the top right corner of the exhibitor’s profile.
Map
You can look up an exhibitor in the exhibit hall by selecting their name from the list. The selected exhibitor will be highlighted on the map for you.